|
- Contents |
|
By Paul "Villam" Steed
Anything I say comes from me and represents my personal opinions, views and subtle plans for influencing society. Read, ruminate over and remember at your own risk. If I teach you something and it helps, teach someone else.
So. For this week’s tutorial I was going to go over how I made a cool bird-in-flight model for the ‘flight’ icon in Quake 3:Arena (that little game I’ve been working on in between contributing to loonygames). But I had this sudden brain flatulence and decided to do a sort of ‘modeling diary’ for the character I was getting ready to build. From start to finish I wanted to finally address all those requests for sharing, ‘how I do it…’ with you guys. So that’s what I did. Be forewarned, though. With the narration stops to jot the diary ‘entries’ and the creation of the model itself, the chronal unit consumption was nigh on six hours. This is a loooong tutorial. The way I did this is simple but let me explain it to you so you can better understand my stream-of-consciousness…streamings below. Normally I save the model right before I make important changes to it in case I mess it up and the autosaves are whacked. Typically I’ll have something like, ‘shauna01’ then ‘shauna02’ then ‘shauna03’, etc. The reason why I give the model a name and then ‘01’ is because I know I’ll more than likely have more than ten iterations of the model before I’m finished and if I start with ‘shauna1’ instead of ‘shauna01’ then when I get to ‘shauna11’ it will be numerically after ‘shauna1’ in the directory. Get it? Also it’s because Max is too stupid to realize that if I name something ‘shauna1’, then by hitting the ‘+’ that automatically saves your file out ‘plus’ one numerically, that the model name after ‘shauna1’ should be ‘shauna2’. Hitting the ‘+’ button under save file with shauna1 queued up will result in the creation of a file called ‘shauna101’. Confused? Who’s on first? No, Who’s on second. Ah, just try it. You’ll see what I mean. Ahem. Like I said. Normally I have anywhere from twelve to thirty versions of a model saved as I make it (depending on its complexity, of course). For this model I made (called Sleeg, BTW) I saved over one hundred and ten versions. Each save is basically a paragraph punctuating the ‘entry’ and made it easier for me to make a screenshot of the model, effectively illustrating the text. Accordingly I’ve asked Loonyboi to just post chunks of entries and screenshots roughly a third at a time and turn this beast into a three-parter. At one hundred ten images with text this is the most thorough tutorial I’ve ever written (or I’d wager has been written) on modeling a character in Max. Unfortunately The images need to be there so it’s not very practical to throw them all out there at once. So I get to sit back for the next three weeks as you digest my lengthy instructorial spiel. Now. Realize that I’ve basically blurted onto paper my thoughts and techniques as I built this character. I’m not saying my way is the best and that there aren’t better ways to do the things I’ve done to achieve this character. However. The following is excerpts from my mind. Scary as that sounds, it’s not all that bad a place, just a little depraved and unglamorous. Be especially warned about bad language contained herein. If Cussing offends you, then don’t even bother continuing. Six years in the military and seven years in this industry puts the ‘f’ in profanity for my inexcusable potty mouth. In other words, kids I use bad words below. I’ve chosen to retain those bad words because those bad words are what popped up in my head. Thusly they popped up in this here first installment of the ‘modeling diary’ issues of TOTB. Normally a grammar and spelling Nazi, I only did cleanup on sentences making sure they had proper capitalization. Everything else falls under the blanket ‘stream-of-consciousness-doesn’t-follow-good-grammar’ excuse. So without further adieu, dive into my head. Like I said, it’s definitely not a pretty place…
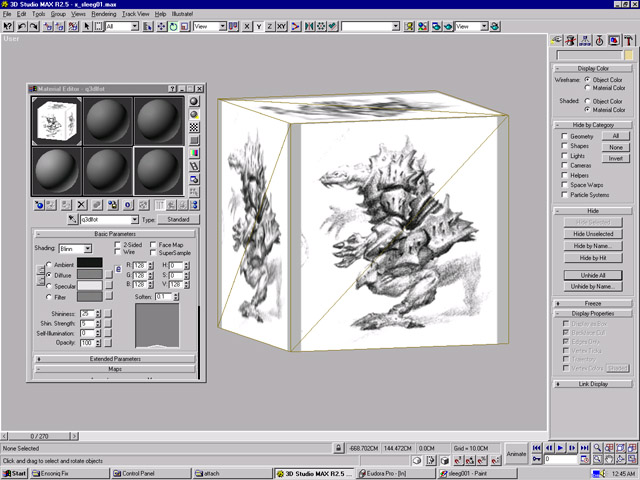
Whoohoo! Here we go. First thing I do is of course pick a name for this critter. ‘Sleeg’, he whisssspersss to me inssssidioussssllly. Okay Sleeg, the first thing we gotsta do is make a material out of your ugly-ass image from Mr. Adrian’s sketchbook. So I make the image and save it out as a 512 x 512 ‘.tif’ since I use .tifs as a code for reference materials-only. I also strive to make them by powers of 2 since my settings digest a 512 x 512 image better than a 439 x 772 image. After I make the material I map it onto a box that happens to be the same dimensions of the image.
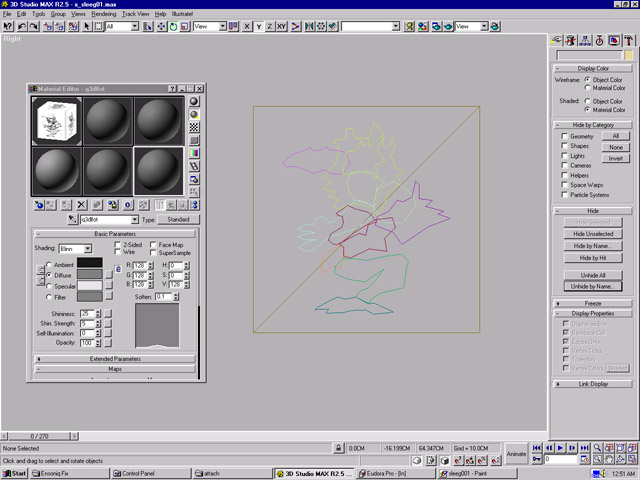
After the sketch has been mapped onto a box I need to outline the main shapes by sliding the box far enough back so the lines being created on the construction plane are in front of the box. Keeping the texture-visible, shaded mode ‘on’ I go ahead in the right view and make the outlines of the shapes I know I’ll be building. Sleeg’s giving me his profile in this sketch but a front view works as well. Ideally both front and side are there but hey, I’ll improvise wit’ what I got.
Now, hiding the box (or even deleting it, whatever I feel like) I decide to either extrude the line I made based on the mapped sketch or tweaking a primitive to conform to the object in question. In this case let’s go ahead and start with the head and neck area and begin with a 6-sided, 4-segmented cylinder. Now scale it and move it into a relative starting position.
|